As a Salesforce user, things might become a little difficult at times. However, customers today demand a better experience, and Salesforce admins need better ways to connect with users, provide training, send text messages, and take action. Earlier, it was possible via training webinars, creating hundreds of release notes pages, or sending e-newsletters.
This strategy leads to limited success, and the information provided was inadequate or too difficult to access. And the best way to interact with users is to interact with them in the app while using it. This is where In-App Guidance in Salesforce comes into the picture to provide Salesforce users a brand new way to increase user engagement.
What Is In-App Guidance In Salesforce?
In-App Guidance is a new platform tool that allows administrators to build and personalize prompts for training and onboarding users where and when they need assistance.
All the while, administrators were reliant on ineffective communication methods such as Chatter or Email to reach out to people. With Lightning Experience’s In-App Guidance, it turns out that the ideal way to engage with people is to communicate with them inside Salesforce.
In-App Guidance enables users to add and edit commands declaratively. Admins can write content, choose who to target, and determine where and how long the content will be displayed. Using an orchestration mechanism, In-App Guidance detects how the user interacts with the command to decide whether or not to display the command again after the user takes the desired action. In-App Guidance is available today in Lightning Experience and in Essentials, Group, Professional, Enterprise, Performance, Unlimited, and Developer.
The In-App Guidance prompts are divided into the following categories:
-
Single Prompt
-
Walkthrough
We can only use these to make one prompt, as the name implies. They are further divided into the following categories:
-
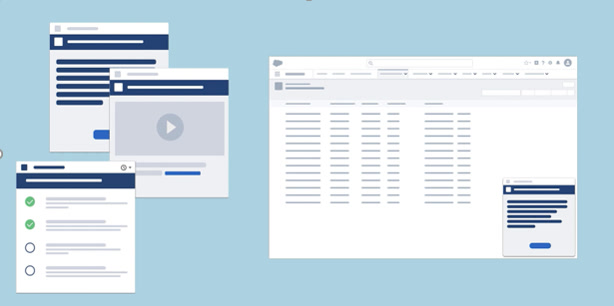
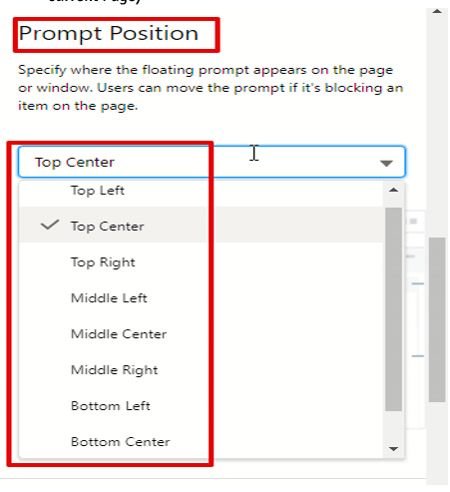
Floating Prompt: This prompt can be placed on the page in one of six specified locations. If this prompt is blocking any of the on-screen functions, users can navigate around it.
-
Docked Prompt: This prompt is always in the bottom right corner of the screen. It can include a video and can be minimized, maximized, or closed.
Use Cases For In-App Guidance
-
Educate users: Provide a link to the trailhead about the feature on the exact page where the feature appears.
-
Onboard new users: Offer tips and tricks to introduce new users to the app’s most used features.
-
Highlight changes: Notify specific user groups (by permission) of policy changes that may affect them.
-
Make announcements: Write a universal message, such as B. Policy updates and travel costs for everyone.
In -App – Guidance Setup in Lightning Experience:
In Lightning Experience, In-App Guidance are prompts and walkthroughs to our apps to share information, train, or onboard users. We can write the content, select the target audience, and specify where it appears and for how long. We can add multiple items to the same page, but they don’t appear at the same time. By default, a user sees only one item per 24 hours, per app. Salesforce shows it again or cancels scheduled recurrences based on whether the user interacts with or ignores the prompt or walkthrough.
How To Apply In-App Guidance In The Salesforce Org?
-
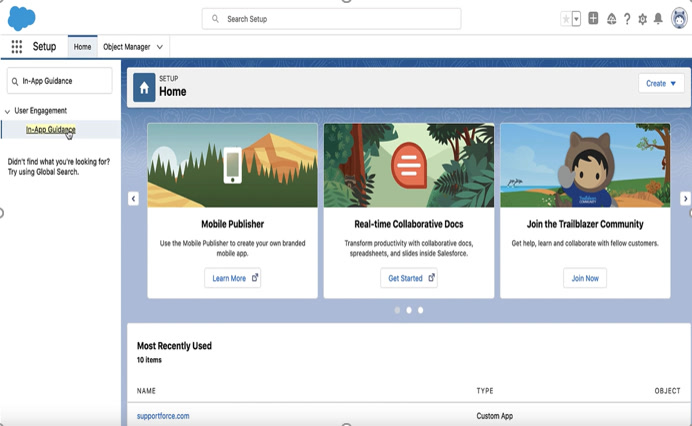
First Go to Setup, In the Quick Find Box Search –> In-App Guidance
-
Click on In-App Guidance under User Engagement, and the page below will open on your screen.
-
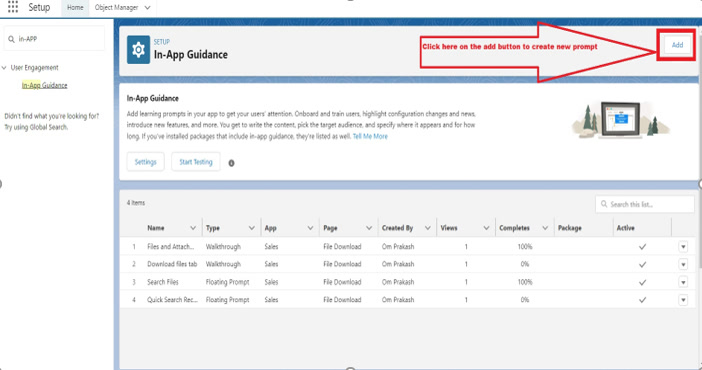
If there is no pre-existing In-app Builder, Click the Add button on the bottom to create a New Prompt. You will be taken to the newly updated In-App Guidance Builder.

-
If there’s a pre-existing In-app Builder previously Added, we’ll get a list of them. Click the Add button on the top right to create a new prompt. You will be taken to the newly updated In-App Guidance Builder.
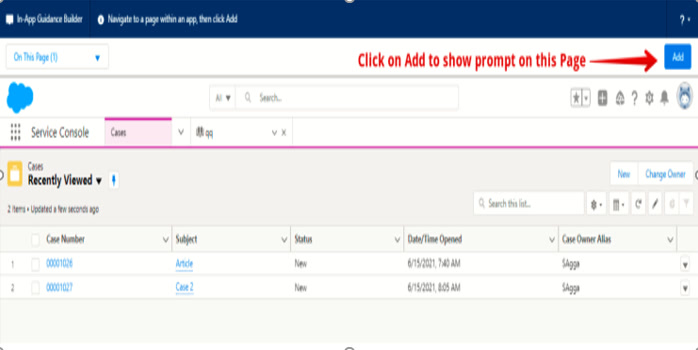
-
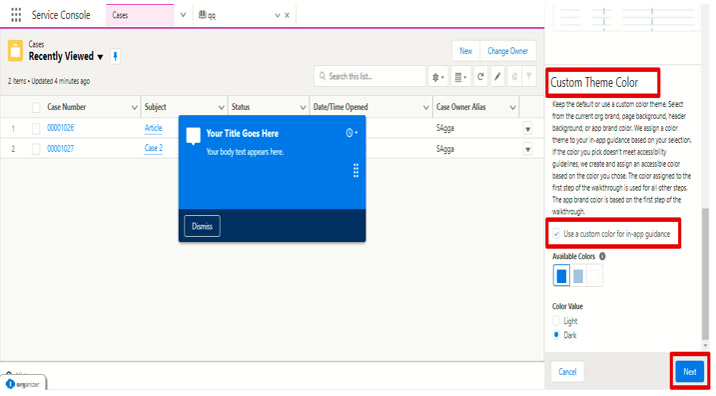
Now go to the screen you want to add a prompt to(by searching it from the app launcher) and then click the Add button on the far right. Here, I’m using the Case List View Page –
-
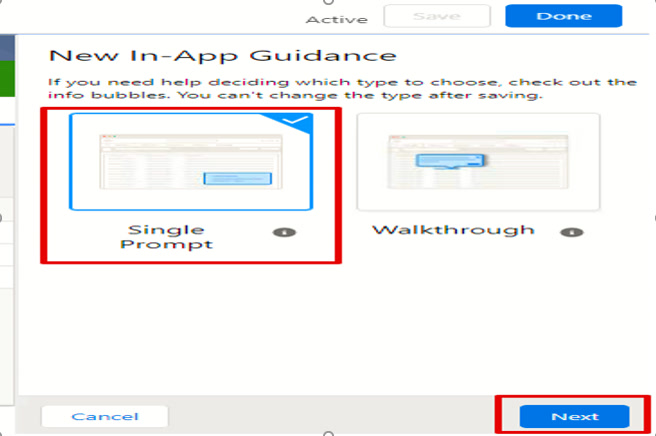
Now a new screen will appear on the Right Side of the screen. Select any of these prompts. I am using the Single Prompt option here.
-
Click Next after selecting it.
-
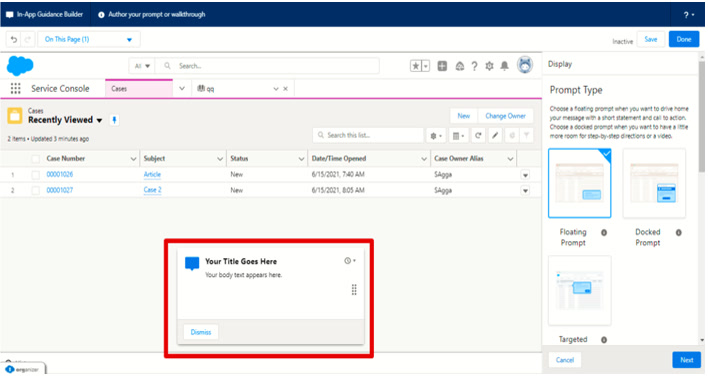
You can add the Prompt on List view or in Detail Record View. You will see the Demo of the Prompt on the Screen; Scroll Below for more options. If you choose floating, then you get the ability to set where you want it.(i.e. Location and Position on the current Page)
-
Mark the “Use a Custom color for in-app guidance” as checked and choose colour & value as your preference.
-
After Selection, Click Next.
-
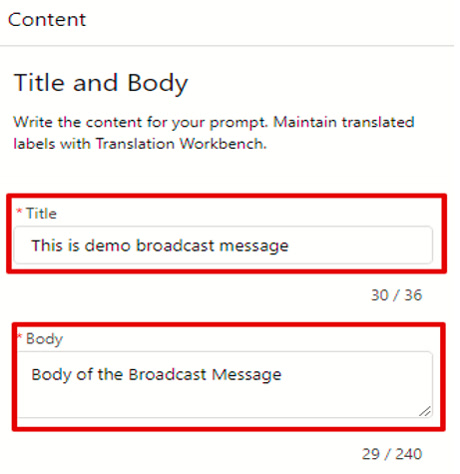
On the Next Screen, you will be asked for the Title & Body of the prompt.
-
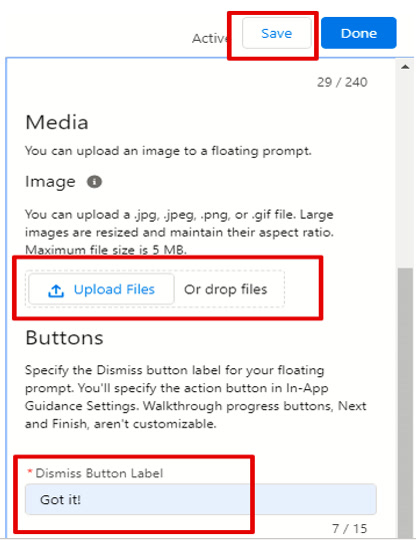
Scroll below for more options to Upload the Image & Label of the Dismiss Button. (Adding Image isn’t necessary)
-
After entering everything, you need to Save from the button on Top to bring up an activation walkthrough.
-
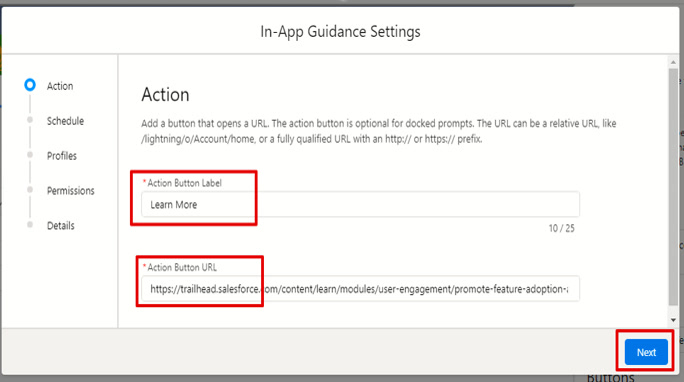
Now, name your buttons and provide the link to where the prompt lives & click Next.
-
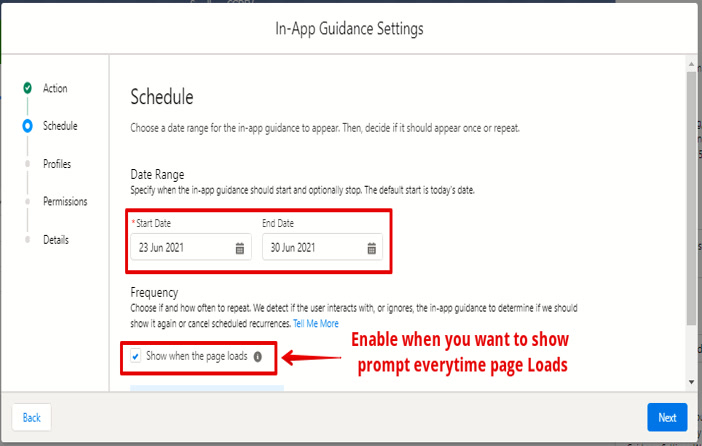
After this, Schedule for how long and for how many times the user should see the prompt.
-
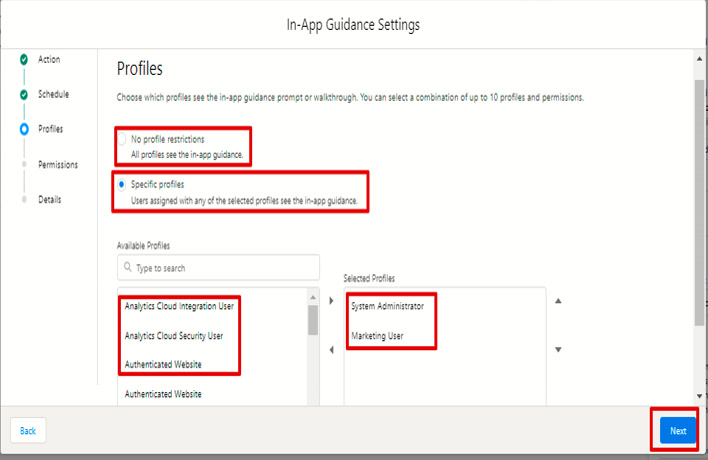
Select the profiles/ permission sets that should be applied. You also can have it apply to everyone. (You can select profiles/permission sets; you are limited to 10).
-
If you Select No Profile/Permission restrictions, everyone will see the prompt every time the page loads.
-
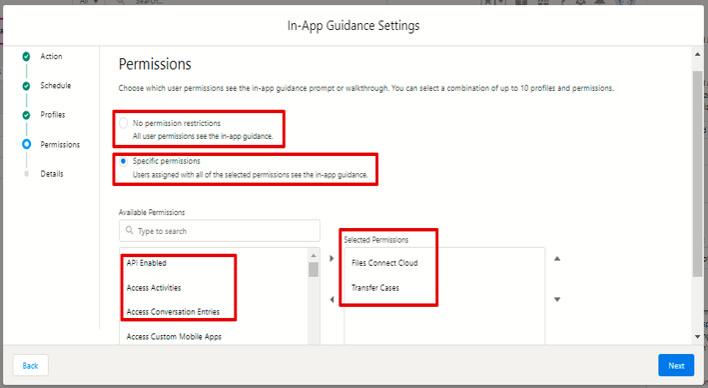
The same goes for the Permission like profiles above. If you select specific Permission, then users having only Selected profiles will be able to see it.
-
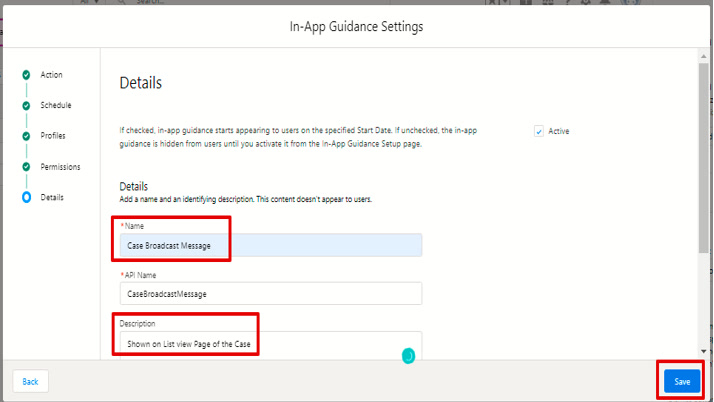
Finally, you are giving the prompt itself a name and a description & click Save.
-
By Clicking on the Learn More button, you will be redirected to the Action Button URL you saved earlier. And by clicking on the Got it button, the prompt will get dismissed.
-
From the In-App Guidance Page from Setup, you’ll see the Views of the prompt, its active status & can edit if you need to make any changes.

Who can create an In-App Guidance prompt?
For this, you have to go on Individual Profile and allow the In-App Guidance setting in it.
-
First, Go to Profiles from the Quick Find box on Setup.

-
Select the Profile to whom you want to give create/edit/delete Access. Then Scroll below & Go to Profile’s System Permissions.
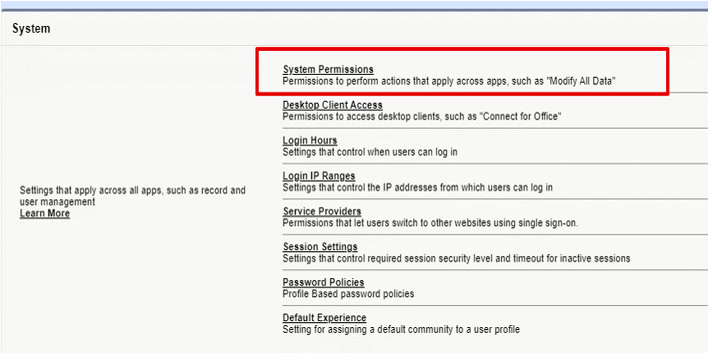
-
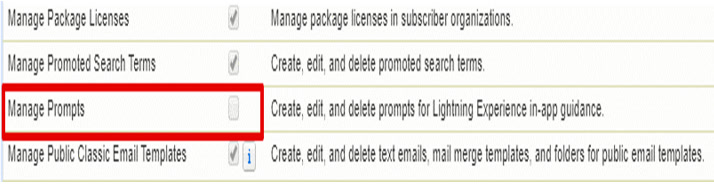
After this Edit & Enable the Manage Prompts permission & save it.
Conclusion:
With In-App Guidance, you can develop and distribute prompts and walkthroughs to your teams with only a few clicks rather than coding. Consider bite-sized pieces of content that are easy for your staff to consume and produce immediate effects. Although Salesforce provides hand-picked resources to assist users in working with the app, you can take the Help Menu to the next level by creating a custom section that appears globally. In addition, employees can access In-App Guidance prompts and walkthroughs at any time by adding links to them.
Comments
One response to “Introduction to Salesforce Lightning – In App Guidance”
[…] Lightning Testing Service is tailored to evaluate Salesforce Lightning components directly in the Salesforce […]